Wednesday, June 20, 2012

Home Management Binder

I saw this somewhere, and I cannot find it again. I did think that this was a good idea in case of an emergency (heaven forbid!), and to keep myself a little more organized.

I used a left over binder from the end of the school year and started out by adding my daily chore sheet into the clear pocket. It used to hang on the side of the fridge, but I decided that everyone who comes over does not need to know how I clean my house.


I got some write on dividers by Avery and also utilized some that were left over from the school year. My tabs are:
  • Weekly Planner
  • Emergency Information
    • One colorful tab for each child and one for the adults
  • Phone Numbers
  • Lunch Menus 
  • Pet Care
  • Blog
  • Home Inventories
  • Out of Town Checklists
  • Survival (Hubby's Idea)
  • Notes
 I found the weekly planner printables somewhere on Pinterest, and yet I did not save it (bad me).  *If this is yours, please let me know so I can give you credit* I love that this has a weekly meal planner and plenty of room to write down important events. Much easier to use than my white board.

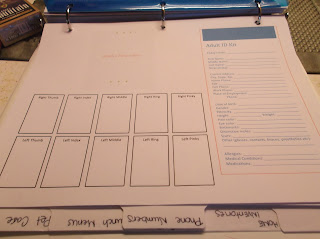
The emergency Information sheets were found here. I printed 2 adult and 4 child sheets. Both of which have a spot for fingerprints, personal info, and a picture. A new one will be printed out each year so that the pictures can be updated.


Adult


Child


I also put my marriage certificate and birth certificate into the pockets of the adult divider. (Not showing as I don't want my personal info all over here)

The phone numbers page was found here. Instead of typing in all of the info first, I just left it blank to write them in as more will come.

The lunch menus will be empty until school starts back up and a new one will be hole punched and put in every month.

The Pet Care Sheet has not been made, and will not be frequently used as we don't go out of town long enough for someone to have to come take care of them, but it will be something I print up using Microsoft Word.

The Blog tab is just a bunch of notebook paper that I use to write down ideas of what I am to blog about.

The home inventories tab is just a word document of movies, music, special items, and collectables that we have (just in case of a robbery or something *again heaven forbid*).

We frequently go out of town to transport my step boys back and forth to their mom's house and again this just has notebook paper so I can write down things that I need to remember to pack.

The survival tab....well I had one extra and my husband has this thing about being prepared in case if we have to survive on very little (ie: loss of job, natural disaster, Armageddon etc.) It too has notebook paper so I can fill it in as I go.

The notes tab is more of a Misc. category that I can just write down anything extra that is needed to be remembered.

At the last minute I decided that in order for this to be a "home management notebook", it needed to have some sort of financial management too. I found a calendar here.  Instead of printing the whole year and throwing half of it away, I just printed from May on. I wrote "Bills Due" on the top of each page and now just write in the days the bills are due. Now we don't have to dig through our bill box to figure it out. =)


Everything was hole punched and put into their corresponding places, and now I feel organized (a little bit).


Sunday, June 10, 2012

Kindle Fire Cover =)

So I finally got the Kindle Fire Cover completed. It does not look as great as I had hoped for, but I think it still looks pretty good.

Again, I gutted a book.
This time, I didn't cut myself!!

I then measured and cut another piece of quilt badding, black fabric for the inside, 2 pieces of orange fabric for the inside and the grey piece for the spine.


Then, I hemmed up the edges so they didn't fray.

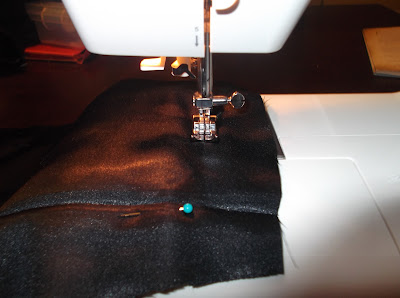
 The next step was pretty easy too. I sort of quilted (not sure on the term here) the badding to the black fabric. This looked pretty cool (again, to me).


Then I sewed the orange fabric to the black, right sides together. Be sure to measure and fit before making any final stitches.


The grey fabric presented a small challenge, and I accidentally sewed one side to the wrong side of the orange. Either way you do it, sew the grey to both edges of the orange.

Now, turn it all inside out and sew a seam across the top. Make sure to get the placement correct. 

Then turn it right side and put the book back in. Fold the remaining fabric inside and pin it closed. 
 

 I hand stitched the bottom, just like I assume you would to finish up a pillow.  It turned out pretty cool, except I forgot to fasten it somehow. For now, it will work though. =)


Thursday, June 7, 2012

Handprint Heart

This was a simple project that the kids simply loved to make. =) My friend De'von brought her son over and our toddlers made these.

I made salt dough using this simple recipe.

2 Cups Flour
1 Cup Salt
1 Cup Lukewarm Water

Mix the flour and salt then gradually add water. Mix until smooth.


We put the dough into heart shaped pans and smoothed out the top with a damp spoon.


This recipe filled two of my heart pans.


We then set the kiddos up at the table and helped them imprint their hands into the salt dough.


My daughter was terrified of it at first, but then wanted to keep putting handprints on everything.


I then baked them at 200 degrees (F) for about an hour. Then I popped them out of the pans (turn them over and bang on the bottoms) and put them on a parchment paper lined cookie sheet. I baked it again for another few hours.

After the color changed on it, I flipped them over and let the back side bake up (it was still a little doughy).

After they were cooled off (and 2 days later) we let the kids finger paint them.

We made the paint. I found the recipe here.

Easy as anything and we let the kids go wild with the paints.

De'von's little boy only wanted green, but dove into it with his hands while my daughter freaked out and barely used her finger to paint.

I then baked them again at 200 degrees (F) for about 20 minutes to let the paint dry.

Before Painting/writing

After Painting/writing
Then we took black paint (laying around the house) and painted in the hand prints and painted their names and date on them.


I some different colored shiny ribbon and tied a steady knot in the top. Now it hangs and looks pretty.


I was originally going to give this to my husband for Father's day, but I may just want to keep it for myself and find him something else. =)

Monday, June 4, 2012

Kindle Fire Cover-1st attempt

So, my step son got a kindle fire for his birthday. He loves it, as does my husband. I am not the greatest crafter, and this did not turn out well to my liking.
I found this on pinterest, and linked it here.

I started out with a book that we don't read. It fit the kindle well. I found some clearance fabric at Walmart and got a great deal on it. =)


I used a box knife to cut the pages out. BE VERY CAREFUL! I cut myself twice on this step.


I don't think I was supposed to cut the spine out of the book, but I did. I re-enforeced it with packing tape and called it good.


I measured and cut out quilt badding for the inside.

 I sprayed carpet and headliner adhesive on the cover. I did not have the actual fabric spray used in the original blog, so thought this would work too. I am not a fan of it for this project.


I then measured and cut a piece of black fabric and spray glued it to the badding and edge of the book.


I let it dry. The next step is to cover the outside. I cut a piece of orange fabric 2 inches larger than the front and back covers of the book. I sprayed the front cover, pushed on the fabric and let it dry.


The adhesive is visible through the fabric, but I hoped it would dry and go away. It did not.


I opened the book and cut, and folded the excess fabric over. I sprayed and glued it down too.

I did the same to the back side, however, I added sticky velcro to the fabric on the book side (so it would fold over and close).


This is how it looked.


I stopped taking pictures at this point, I knew it was not going to end well for me.
However, I did cut a piece of grey fabric to fit down the spine of the book cover and spray glued it into place.

I added the opposite end of the sticky velcro to the front cover, and put grey fabric to the sticky side of the first piece.

I guess it turned out alright, however, I am not happy with it. I will be making a second attempt with the sewing machine and making a slip cover type. Hopefully that will work out better for me.

I will be starting that tonight and hopefully have his cover finished and posted by tomorrow. =)